Title: Delightful Mini Summer Fruit Tarts: A Refreshing Treat for Any Occasion
Introduction
As the warm sun graces us with longer days and a vibrant array of seasonal fruits, summer becomes the perfect time to indulge in refreshing desserts. Among the myriad of sweet treats that the season offers, mini summer fruit tarts stand out as a delightful choice. These charming desserts are not just visually appealing; they also encapsulate the essence of summer with their light, fruity flavors that dance on the palate. Mini tarts are the ideal dessert for gatherings, picnics, family dinners, or just a casual afternoon treat at home. Their versatility allows them to shine at any occasion, whether it be a festive celebration or a simple get-together with friends.
What makes these mini summer fruit tarts particularly appealing is their simplicity. With just a few key ingredients and straightforward steps, you can create a dessert that looks and tastes like it belongs in a gourmet bakery. The blend of a buttery crust, creamy filling, and a colorful assortment of fresh fruits creates a harmonious balance of flavors and textures that is sure to impress. If you’re looking to elevate your summer dessert game, this recipe for delightful mini summer fruit tarts is a must-try.
Understanding the Components of Mini Summer Fruit Tarts
Before diving into the recipe, it’s essential to understand the three primary components that come together to create these delightful tarts: the crust, the filling, and the topping. Each element plays a crucial role in achieving the perfect balance of taste and texture.
1. The Crust: The crust serves as the foundation of the tart, providing a satisfying crunch that contrasts beautifully with the creamy filling and fresh fruit. A well-made crust is buttery and flaky, setting the stage for the vibrant flavors that follow.
2. The Filling: The filling is the heart of the tart, offering a creamy texture that complements the tartness of the fruit. A zesty and smooth filling brings depth of flavor, enhancing the overall experience of each bite.
3. The Topping: The topping is where creativity can flourish. Using a colorful array of seasonal fruits not only adds visual appeal but also allows for a delightful medley of flavors. The natural sweetness and juiciness of the fruit provide a refreshing contrast to the rich filling.
Each component is essential to crafting a mini tart that truly embodies the spirit of summer. Now, let’s delve into crafting the perfect tart crust, the first step in creating these delectable desserts.
Crafting the Perfect Tart Crust
The tart crust is a crucial element in achieving the ideal balance of taste and texture in your mini summer fruit tarts. A well-prepared crust not only supports the filling but also enhances the overall flavor profile of the dessert.
– Ingredients for the Crust: To create the perfect tart crust, you will need the following ingredients:
– All-Purpose Flour: This is the foundation of your crust, providing structure and stability.
– Powdered Sugar: Adding sweetness and a delicate texture, powdered sugar helps create a tender crust that melts in your mouth.
– Unsalted Butter: The star ingredient that adds flavor and richness. It’s essential to use cold butter to achieve a flaky texture.
– Egg Yolk: This adds richness and helps bind the ingredients together, contributing to the crust’s overall structure.
– Vanilla Extract: A touch of vanilla enhances the flavor of the crust, adding warmth and depth.
– Salt: A small amount of salt balances the sweetness and elevates the overall flavor.
– Step-by-Step Instructions: Creating the crust is a straightforward process that involves mixing, chilling, and pressing:
1. Mix the Dry Ingredients: In a medium mixing bowl, combine the all-purpose flour, powdered sugar, and salt. Whisk them together to ensure an even distribution.
2. Cut in the Butter: Dice the cold unsalted butter into small cubes and add it to the flour mixture. Using a pastry cutter or your fingertips, work the butter into the flour until the mixture resembles coarse crumbs.
3. Incorporate the Egg Yolk and Vanilla: Add the egg yolk and vanilla extract to the mixture. Stir gently until the dough starts to come together. If the dough appears too dry, you can add a teaspoon of cold water at a time until it holds together.
4. Chill the Dough: Shape the dough into a disc, wrap it in plastic wrap, and refrigerate for at least 30 minutes. Chilling the dough is essential for preventing shrinkage during baking and ensuring a tender crust.
5. Press into Tartlet Pans: Once chilled, remove the dough from the refrigerator. On a lightly floured surface, roll out the dough to about 1/8-inch thick. Carefully cut out circles and press them into the greased tartlet pans. Ensure the dough is evenly distributed along the bottom and sides, making sure there are no air pockets.
Baking the Crust to Golden Perfection
Baking the crust is a critical step that enhances the flavor and structure of your mini summer fruit tarts. Achieving the perfect golden crust is essential for a delightful dessert.
– Optimal Baking Temperature and Time: Preheat your oven to 350°F (175°C). Place the prepared tartlet pans on a baking sheet for easier handling. Bake the crusts for about 12-15 minutes, or until they are lightly golden and firm to the touch. Keep an eye on them towards the end of the baking time, as ovens can vary in temperature.
– Cooling Process: Once baked, remove the crusts from the oven and allow them to cool in the pans for about 5 minutes. Then, gently transfer the tarts to a wire rack to cool completely. Allowing the crust to cool thoroughly is crucial for successful tart assembly, as a warm crust may cause the filling to melt or become runny.
Creating a Creamy and Zesty Filling
With the crust prepared, the next step is to create the filling, which serves as the heart of the tart. A creamy and zesty filling adds richness and complements the fresh fruit beautifully.
– Ingredients for the Filling: To prepare the filling, you will need:
– Cream Cheese: This provides a rich and creamy base for the filling.
– Powdered Sugar: Sweetens the filling while ensuring a smooth consistency.
– Vanilla Extract: Adds warmth and enhances the overall flavor.
– Lemon Juice: A splash of lemon juice brings a zesty brightness that elevates the creaminess of the filling.
– Mixing Techniques for a Smooth Consistency: To achieve a creamy filling, follow these steps:
1. Soften the Cream Cheese: Begin by allowing the cream cheese to soften at room temperature for about 15-20 minutes. This step is crucial for ensuring a smooth filling without lumps.
2. Combine Ingredients: In a mixing bowl, add the softened cream cheese, powdered sugar, vanilla extract, and lemon juice. Using an electric mixer, beat the ingredients together on medium speed until the mixture is smooth and creamy, scraping down the sides of the bowl as needed.
3. Adjust Consistency: If the filling is too thick, you can add a teaspoon of milk or cream to reach your desired consistency. The filling should be creamy and spreadable, making it easy to dollop into the cooled tart crusts.
With the crust and filling prepared, you are well on your way to assembling your delightful mini summer fruit tarts. The vibrant colors and flavors of seasonal fruits will soon transform these tarts into a show-stopping dessert. Stay tuned for the next part of the recipe, where we will explore the art of topping these tarts with fresh fruits and finishing touches that make them truly irresistible.
Tips for Achieving the Perfect Creamy Texture and Consistency for the Filling
Creating a luscious filling for your mini summer fruit tarts is essential to their overall appeal. The filling should be creamy, smooth, and flavorful, complementing the fresh fruits beautifully. Here are some tips to achieve that perfect texture:
1. Room Temperature Ingredients: Ensure that your cream cheese is at room temperature before mixing. This allows for easier blending and prevents lumps in your filling. If you’re using any other dairy products, like sour cream or whipped cream, make sure they are also at room temperature.
2. Proper Mixing Technique: Start by beating the cream cheese alone until it’s light and fluffy. Gradually incorporate the sugar and vanilla extract, mixing until fully combined. For an even creamier texture, you can use an electric mixer on medium speed to ensure that the mixture is well-aerated.
3. Add Whipped Cream Gently: If your recipe includes whipped cream, gently fold it into the cream cheese mixture rather than mixing it vigorously. This technique preserves the airiness of the whipped cream, giving the filling a light texture.
4. Taste and Adjust: Before filling the tart shells, taste the mixture. You can adjust the sweetness with more sugar or add a splash of lemon juice for a zesty kick. A well-balanced filling ensures that it complements the sweetness of the fruits.
Assembling the Tarts: Bringing it All Together
Now that you have prepared your tart shells and creamy filling, it’s time to assemble your delightful mini summer fruit tarts.
Filling the Tarts
1. Cool the Tart Shells: Begin by ensuring your tart shells are completely cooled. This step is crucial because filling warm shells could cause the filling to melt and lose its structure.
2. Fill with Cream Cheese Mixture: Using a piping bag fitted with a large round tip, carefully fill each tart shell with the cream cheese mixture. Start from the center and work your way to the edges for an even distribution. If you don’t have a piping bag, you can use a spoon to dollop the filling into each shell, smoothing it over the top.
3. Smooth the Top: After filling, use a small offset spatula or the back of a spoon to smooth the tops of the tarts. This will give them a polished look and make them easier to arrange the fruit on top.
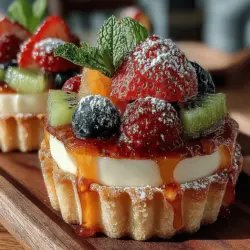
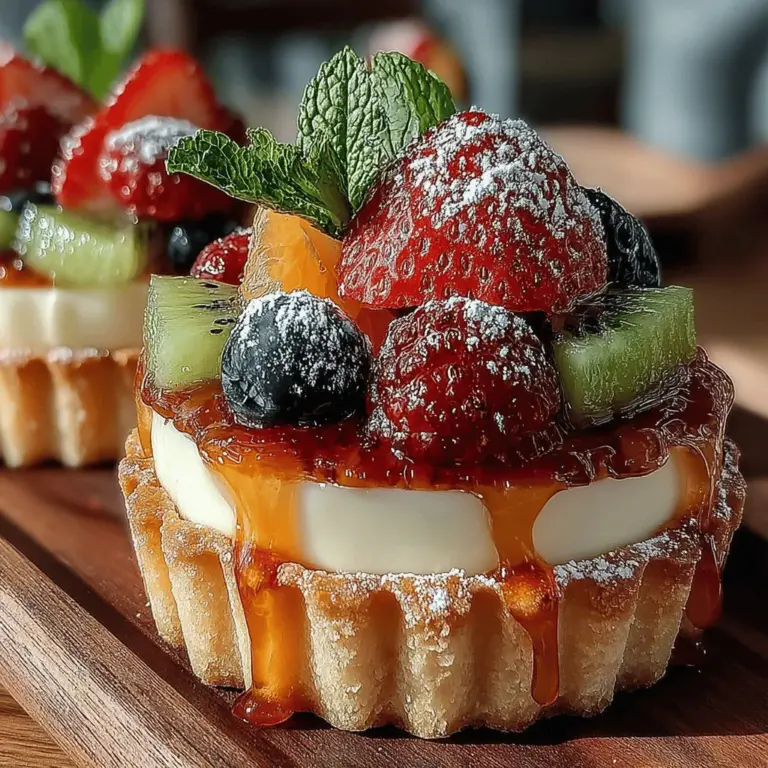
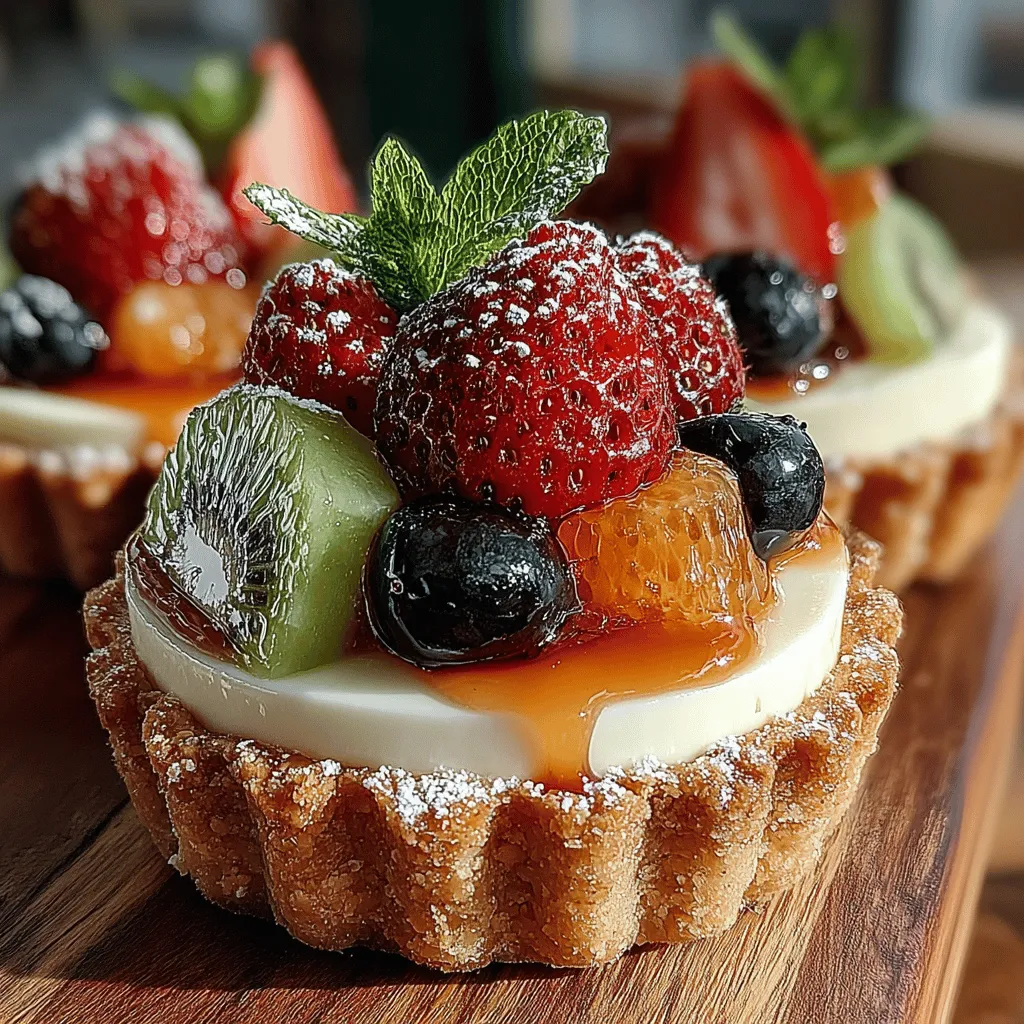
Arranging the Fresh Fruit Toppings
The fruit is the star of these tarts, so arranging them beautifully is key to making them visually appealing.
1. Choose a Color Palette: Select a variety of fruits that offer a range of colors, such as strawberries, blueberries, kiwi, raspberries, and blackberries. This variety not only adds visual interest but also different flavor profiles.
2. Layering Technique: Start by placing larger fruit pieces, like sliced strawberries or kiwi, around the edges of the tarts. Then fill in the center with smaller fruits like blueberries and raspberries. This method creates a vibrant, layered look.
3. Creative Patterns: Get creative with your arrangements. You can create simple patterns by alternating colors or even arrange the fruits in a circular pattern for a more artistic presentation.
Enhancing Flavor with an Optional Glaze
To elevate your mini summer fruit tarts even further, consider adding an optional glaze. This not only enhances the flavor but also gives a lovely shine to the fruits.
Glaze Ingredients and Preparation
For a simple apricot glaze, you will need:
– 1/4 cup apricot preserves
– 1 tablespoon water
– 1 teaspoon lemon juice
Preparation:
1. In a small saucepan over low heat, combine the apricot preserves, water, and lemon juice. Stir until the mixture is smooth and slightly runny.
2. Remove from heat and let it cool slightly before applying.
Application Techniques
1. Brush the Glaze: Using a pastry brush, gently apply the glaze over the arranged fruits. This will give them a beautiful, glossy finish and help prevent the fruits from drying out.
2. Even Application: Ensure that you cover all the fruit pieces without saturating the tarts. A light coating is all that’s necessary to achieve that polished look.
Chilling the Tarts for the Best Experience
Once assembled, it’s crucial to chill your mini summer fruit tarts before serving.
Setting Time
Chilling the tarts allows the filling to set properly, making them easier to serve and eat. Additionally, it helps meld the flavors together, enhancing the overall taste. Aim to chill the tarts in the refrigerator for at least 1-2 hours before serving. This not only firms up the filling but also allows the glaze to set, ensuring that everything stays intact when you cut into them.
Serving Suggestions and Presentation Ideas
Presenting your delightful mini summer fruit tarts can enhance their appeal, especially at gatherings.
Garnishes and Pairings
1. Fresh Mint Leaves: A sprig of fresh mint placed on top of each tart adds a vibrant pop of color and a refreshing aroma. Not only does it look appealing, but it also complements the fruity flavors beautifully.
2. Plating Ideas: Consider serving the tarts on a tiered cake stand for an elegant presentation. This not only elevates the visual aspect but also makes it easier for guests to grab their favorite tart.
3. Drink Pairings: Pair your tarts with a refreshing beverage. Iced tea, lemonade, or even a light sparkling wine can complement the tart’s flavors, making them a perfect treat for summer gatherings.
Conclusion
Delightful mini summer fruit tarts are a celebration of seasonal flavors and vibrant colors, making them the perfect dessert for any summer occasion. With a simple crust, a creamy filling, and beautifully arranged fresh fruit, these tarts are not only visually stunning but also a joy to make.
By following the tips outlined for preparing the filling, assembling, and presenting your tarts, you can create a dessert that will impress family and friends alike. Embrace the joy of baking this summer and create lasting memories around the table with these delightful fruit tarts. Whether for a picnic, a family gathering, or a cozy night in, they are sure to be a hit. So roll up your sleeves, gather your ingredients, and get ready to indulge in these gorgeous mini summer fruit tarts!