Introduction
If you’re on the hunt for a delightful and healthy treat that pleases both kids and adults, look no further than Choco-Banana Bliss Pops. This delicious dessert combines the natural sweetness of ripe bananas with the rich, indulgent flavor of chocolate, creating a snack that is as nutritious as it is satisfying. Whether you’re looking for a fun summer treat, a quick after-school snack, or a guilt-free dessert, these pops are sure to become a favorite in your household.
The beauty of Choco-Banana Bliss Pops lies not only in their taste but also in their simplicity. With just a handful of ingredients, you can whip up these delightful treats in no time. What’s more, making them at home allows for creativity in flavor and presentation. From choosing your favorite toppings to experimenting with different chocolate types, each batch can be uniquely yours. The combination of fresh fruit and chocolate makes for an irresistible treat that’s bound to win over even the pickiest eaters.
In this article, we’ll delve into the ingredients that make these pops a health-conscious choice, and we’ll guide you through the straightforward preparation steps. Let’s get started on this delightful journey of Choco-Banana Bliss Pops!
Understanding the Ingredients
Ripe Bananas
At the heart of every Choco-Banana Bliss Pop are ripe bananas. Selecting the right bananas is crucial for ensuring that your pops are sweet and flavorful. Ripe bananas, characterized by their yellow skin with a few brown spots, are at their sweetest and provide a creamy texture that blends beautifully with chocolate. They are not only delicious but also packed with essential nutrients.
Bananas are a great source of potassium, which is vital for heart health and muscle function. They also offer dietary fiber, which aids in digestion and helps keep you feeling full longer. By incorporating ripe bananas into your recipe, you’re not just enhancing the flavor; you’re also adding a significant nutritional boost to your treat.
Dark Chocolate Chips
The chocolate coating is what elevates these pops to blissful heights. When it comes to choosing chocolate, dark chocolate chips are the ideal option. Dark chocolate is known for its higher cocoa content, which means it contains more antioxidants, including flavonoids that can help reduce inflammation and improve heart health.
Moreover, dark chocolate typically has lower sugar content compared to its milk chocolate counterpart, making it a more health-conscious choice. When selecting dark chocolate chips, look for brands that contain at least 70% cocoa for maximum health benefits. Quality matters, so opt for organic or fair-trade brands to ensure you’re getting the best flavor and ethical sourcing.
Coconut Oil
Incorporating coconut oil into your chocolate coating serves two primary purposes: it helps achieve a smooth, glossy finish and contributes healthy fats to your treat. Coconut oil is rich in medium-chain triglycerides (MCTs), which are known to boost metabolism and provide a quick source of energy. This natural fat can also enhance the chocolate’s texture, making it easier to coat your bananas evenly.
When using coconut oil, ensure you melt it gently to avoid overheating, which can alter its properties. Combining coconut oil with your dark chocolate chips will also help prevent the chocolate from hardening too quickly, allowing for a more manageable coating process.
Crushed Nuts
Adding crushed nuts to your Choco-Banana Bliss Pops introduces a delightful crunch and a wealth of nutritional benefits. Nuts such as almonds, walnuts, or pecans not only enhance the texture but also provide healthy fats, protein, and essential vitamins and minerals. Each type of nut brings its unique flavor profile, so feel free to experiment with your favorites!
Almonds are great for their vitamin E content and heart-healthy properties, while walnuts are rich in omega-3 fatty acids, making them an excellent choice for brain health. Pecan nuts add a buttery flavor that pairs well with chocolate. When preparing your pops, consider toasting the nuts lightly to enhance their flavor even further.
Shredded Coconut
For an added layer of flavor and texture, shredded coconut can be incorporated as a topping. This ingredient not only contributes a tropical twist to your pops but also packs a nutritional punch. Shredded coconut is high in fiber, which supports digestive health, and it contains healthy fats that can help keep you satiated.
When choosing shredded coconut, you can opt for either sweetened or unsweetened varieties. Unsweetened coconut is a healthier choice if you’re looking to reduce added sugars in your diet. Additionally, it allows the natural flavors of the bananas and chocolate to shine through.
Sea Salt
A pinch of sea salt may seem like a simple addition, but it plays a crucial role in enhancing the overall flavor of your Choco-Banana Bliss Pops. Salt brings out the sweetness of the chocolate and bananas, creating a more balanced taste profile. Different types of sea salt, such as fleur de sel or Himalayan pink salt, can offer unique flavor notes and textures, so don’t hesitate to explore various options.
The contrast between the sweet banana and chocolate and the slight salinity of the sea salt creates a harmonious blend that elevates your treat from ordinary to extraordinary.
Step-by-Step Preparation of Choco-Banana Bliss Pops
Preparing the Bananas
Now that we’ve explored the essential ingredients, let’s dive into the preparation process for your Choco-Banana Bliss Pops. The first step is to prepare the bananas, which involves cutting them into uniform pieces and inserting popsicle sticks.
1. Selecting the Bananas: Begin by selecting ripe bananas that have a few brown spots. These will be sweeter and more flavorful.
2. Cutting the Bananas: Peel the bananas and place them on a cutting board. Using a sharp knife, cut each banana into thick slices, approximately 1 to 1.5 inches in width. For a fun variation, you can also cut the bananas in half and insert popsicle sticks into the cut ends to create banana “pops” instead of slices.
3. Inserting Popsicle Sticks: Take your popsicle sticks and carefully insert them into one end of each banana slice or half. Make sure to push the stick in far enough to stabilize the banana but not so deep that it goes through the other side. This will allow for easy handling during the dipping process.
4. Freezing the Bananas: Once all the bananas are prepared, place them on a parchment-lined baking sheet in a single layer. Ensure that the pieces do not touch each other to prevent sticking. Place the baking sheet in the freezer for about 1-2 hours, or until the bananas are solid. Freezing the bananas beforehand helps the chocolate coating adhere better and maintains a firm texture when serving.
By following these steps, you’ll set a solid foundation for creating your Choco-Banana Bliss Pops. The next part of this recipe will cover the melting of the chocolate and the exciting process of coating and decorating your pops for a deliciously fun finish. Stay tuned for the continuation of this delectable journey!
Melting the Chocolate
To create the perfect Choco-Banana Bliss Pops, melting the chocolate is a crucial step that requires attention and care. The microwave is a convenient method for melting chocolate, but it’s essential to do it correctly to avoid any mishaps. Start by breaking your chocolate into small, uniform pieces and placing them in a microwave-safe bowl.
Set your microwave to medium power to avoid overheating. Heat the chocolate in short bursts of 20-30 seconds, stirring in between each interval. This stirring is vital as it allows the heat to distribute evenly and helps prevent the chocolate from burning. Keep a close eye on the chocolate; as it begins to melt, it can quickly go from perfectly melted to scorched if left unattended. Once the chocolate is almost fully melted (with just a few solid pieces remaining), remove it from the microwave and stir until it is smooth and fully melted. This method ensures you achieve a glossy, silky texture that will coat your bananas beautifully.
Coating the Bananas
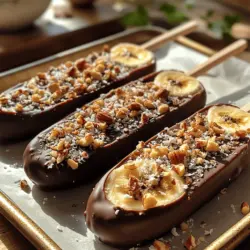
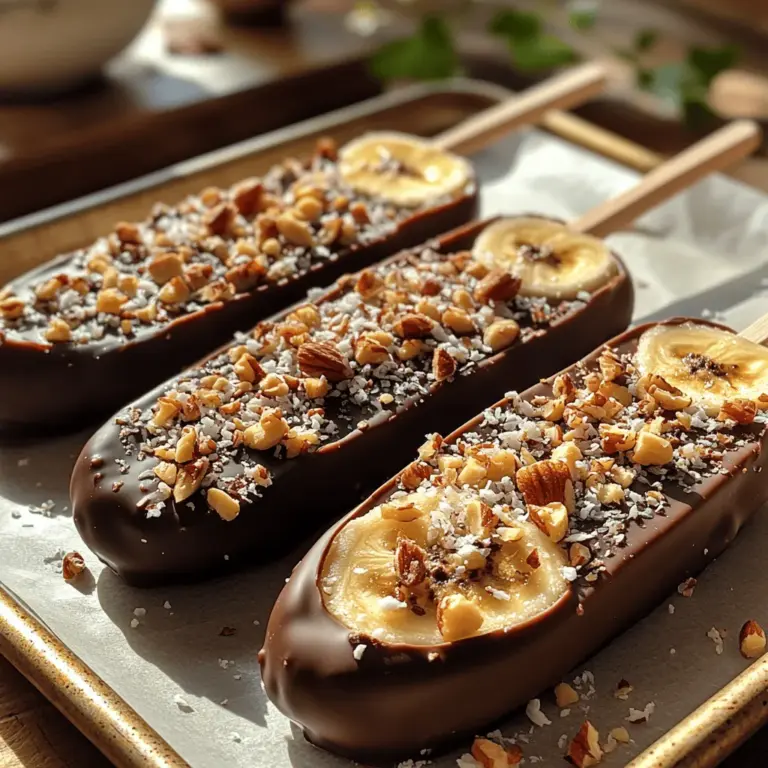
Now that your chocolate is melted, it’s time to coat the bananas. Remove the bananas from the freezer and insert a popsicle stick into each banana half. This step makes it easier to dip them into the chocolate. Hold the banana by the stick, and dip it into the melted chocolate, ensuring that it is fully submerged. You can use a spoon to help coat the banana evenly if needed.
To achieve an even coating, let excess chocolate drip back into the bowl. Swirling the banana in the melted chocolate can also create a unique pattern, giving you a delightful visual effect. Additionally, you can experiment with drizzling some chocolate over the coated bananas for a decorative touch. Once coated, place the bananas on a parchment-lined baking sheet, ready for the toppings.
Adding Toppings
While the chocolate coating is still wet, it’s time to bring your Choco-Banana Bliss Pops to life with toppings. This is where you can get creative! Some popular topping combinations include crushed nuts, shredded coconut, mini chocolate chips, or colorful sprinkles. For a more indulgent treat, consider adding crushed cookies or a dusting of sea salt for that sweet and salty contrast.
To apply the toppings, sprinkle them generously over the chocolate-coated bananas while the chocolate is still wet. This ensures that the toppings adhere properly. You can also create a layered effect by dipping the pops into different toppings, such as first coating them in crushed nuts followed by a drizzle of caramel sauce or a second layer of melted white chocolate.
Freezing Process
Once your bananas are coated and topped, it’s essential to freeze them properly to achieve that perfect pop texture. Place the baking sheet with the coated bananas in the freezer and allow them to freeze for at least 2-3 hours, or until completely solid. This freezing period is crucial not only for achieving the right texture but also for ensuring that the chocolate coating remains intact when you bite into them.
To prevent the pops from sticking together in the freezer, consider placing parchment paper between each banana on the baking sheet. Alternatively, you can wrap each pop individually in plastic wrap once they are frozen. This method not only keeps them from sticking but also makes for easy storage and serving.
Nutritional Benefits of Choco-Banana Bliss Pops
Choco-Banana Bliss Pops are not just a delightful treat; they also provide a range of nutritional benefits. Bananas are rich in potassium, vitamin C, and dietary fiber, making them a healthy base for this frozen dessert. The combination of chocolate with bananas not only satisfies your sweet tooth but also provides a quick energy boost, thanks to the natural sugars from the fruit.
Moreover, dark chocolate is known for its health benefits, including antioxidants that can support heart health and improve mood. By choosing high-quality dark chocolate, you can enjoy these pops without excessive guilt, making them a balanced treat. These pops can fit into a balanced diet, whether as a post-workout snack or a refreshing dessert after a light meal.
Customizing Your Choco-Banana Bliss Pops
One of the best aspects of Choco-Banana Bliss Pops is their versatility. You can customize them to suit your taste preferences or dietary needs. For a different flavor profile, try using different types of chocolate—white chocolate, milk chocolate, or even flavored chocolates like caramel or mint can elevate your pops.
If you’re looking for dietary modifications, making vegan Choco-Banana Bliss Pops is simple. Opt for dairy-free chocolate and ensure that any toppings you choose align with vegan guidelines. For those with gluten sensitivities, many toppings are naturally gluten-free; just check the labels to be sure.
You can also experiment with seasonal variations. During the fall, consider adding a sprinkle of cinnamon or nutmeg to the chocolate for a warm spice flavor. In the summer, using fresh berries or a drizzle of berry puree can enhance the fruity taste.
Serving Suggestions and Presentation
Presentation is key when it comes to serving Choco-Banana Bliss Pops. For gatherings, consider placing them in a decorative container filled with ice, allowing guests to help themselves. You can also arrange them on a platter, using fresh mint leaves for garnish to add a pop of color.
Pairing suggestions for these pops include serving them alongside a bowl of yogurt or a fresh fruit salad, enhancing the overall experience with complementary flavors. For themed parties, consider decorating the pops with seasonal colors or coordinating them with other treats to create a cohesive dessert table. Kids will love them as a fun addition to birthday parties or summer picnics, so get creative with your presentation!
Conclusion
Making Choco-Banana Bliss Pops is not just about satisfying a craving; it’s an enjoyable experience that brings joy to both the maker and the eater. With their delightful combination of flavors and textures, these homemade frozen treats are perfect for sharing with family and friends. They are easy to customize, allowing for endless possibilities in flavor and decoration.
Don’t hesitate to experiment with different chocolate types, toppings, and flavor profiles. The joy of creating these treats lies in the process and the ability to share them with those you love. Enjoy the satisfaction of indulging in a delicious frozen treat that is as nutritious as it is fun to make. So grab your ingredients, get creative, and enjoy your very own Choco-Banana Bliss Pops!