Guilt-Free Peanut Butter Cups Recipe: A Deliciously Wholesome Treat
In recent years, the demand for healthier dessert options has surged, as more people become conscious of their dietary choices and the impact of refined sugars and unhealthy fats on their well-being. With the rise of various dietary trends—such as veganism, paleo, and whole-foods diets—the dessert landscape is evolving. Enter the Guilt-Free Peanut Butter Cups, a delightful treat that allows you to indulge without the accompanying guilt that often follows traditional sweets. These homemade delights serve as a perfect substitute for commercially available candy, combining the rich flavors of peanut butter and chocolate while utilizing wholesome ingredients.
The beauty of Guilt-Free Peanut Butter Cups lies not only in their taste but also in their simplicity. With just a handful of natural ingredients, this recipe is accessible to anyone, regardless of culinary skill level. Whether you are a seasoned chef or a kitchen novice, the preparation process is straightforward, allowing you to whip up these delectable treats in no time.
Understanding the Appeal of Guilt-Free Desserts
Guilt-free desserts are defined by their ability to satisfy your sweet tooth without compromising your health goals. These desserts often utilize natural sweeteners and wholesome ingredients, steering clear of artificial additives and excessive sugars. The benefits of opting for guilt-free desserts are manifold; they can help you maintain a balanced diet while still enjoying the occasional treat.
One of the key principles behind guilt-free desserts is the idea of balance. Enjoying sweets doesn’t have to mean abandoning health; instead, it can be about making mindful choices that allow for indulgence while still keeping your overall wellness in check. By incorporating nutrient-dense ingredients, these desserts can provide not only enjoyment but also essential nutrients that support your body.
Ingredients Breakdown
To create your Guilt-Free Peanut Butter Cups, you’ll need a few simple yet nutritious ingredients, each contributing to the overall healthfulness and flavor of the final product.
Natural Peanut Butter: At the heart of this recipe is natural peanut butter, which provides a creamy texture and rich flavor. Choosing natural peanut butter means avoiding added sugars and unhealthy oils that are commonly found in processed varieties. When selecting peanut butter, you can opt for either smooth or crunchy varieties, depending on your preference. Smooth peanut butter creates a velvety filling, while crunchy adds a delightful texture contrast.
Sweeteners: In place of traditional refined sugars, this recipe calls for natural sweeteners like honey or maple syrup. Both options have their own unique flavors and health benefits. Honey, with its antimicrobial properties, has been used for centuries as a natural remedy, while maple syrup is rich in antioxidants and minerals. Choosing either of these sweeteners allows you to enjoy the sweetness without the sugar crash often associated with processed sugar.
Dark Chocolate: The chocolate coating of your peanut butter cups is another crucial component. Opting for dark chocolate—preferably with a high cacao content (70% or more)—not only elevates the flavor but also provides health benefits such as antioxidants and heart-healthy compounds. The richness of dark chocolate pairs beautifully with the nutty peanut butter, making each bite a decadent experience.
Coconut Oil: This versatile oil serves multiple purposes in the recipe, primarily for melting the chocolate and achieving a smooth consistency. Coconut oil is known for its medium-chain triglycerides (MCTs), which are beneficial fats that can support energy levels. Additionally, it adds a subtle flavor that complements the other ingredients perfectly.
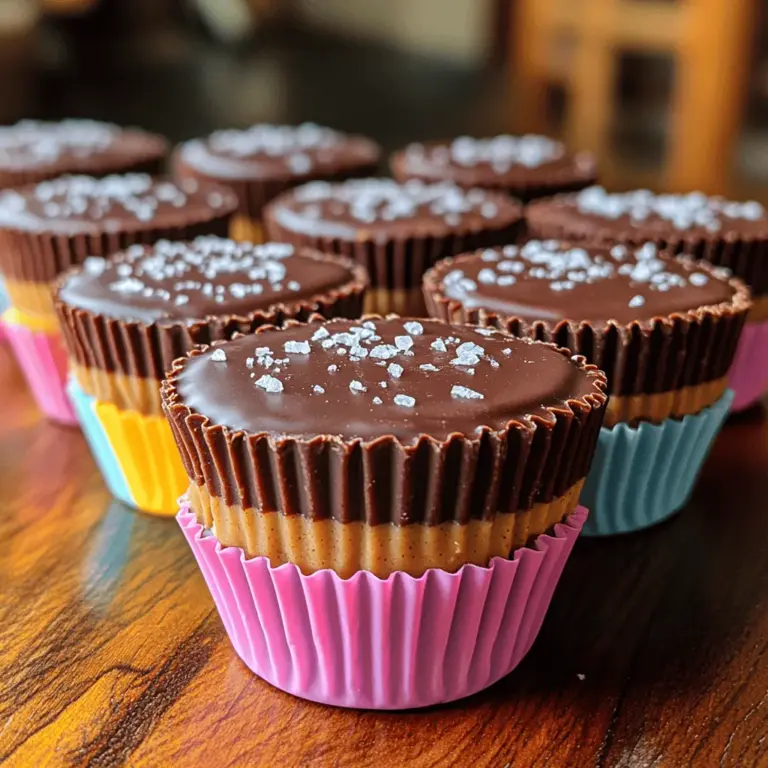
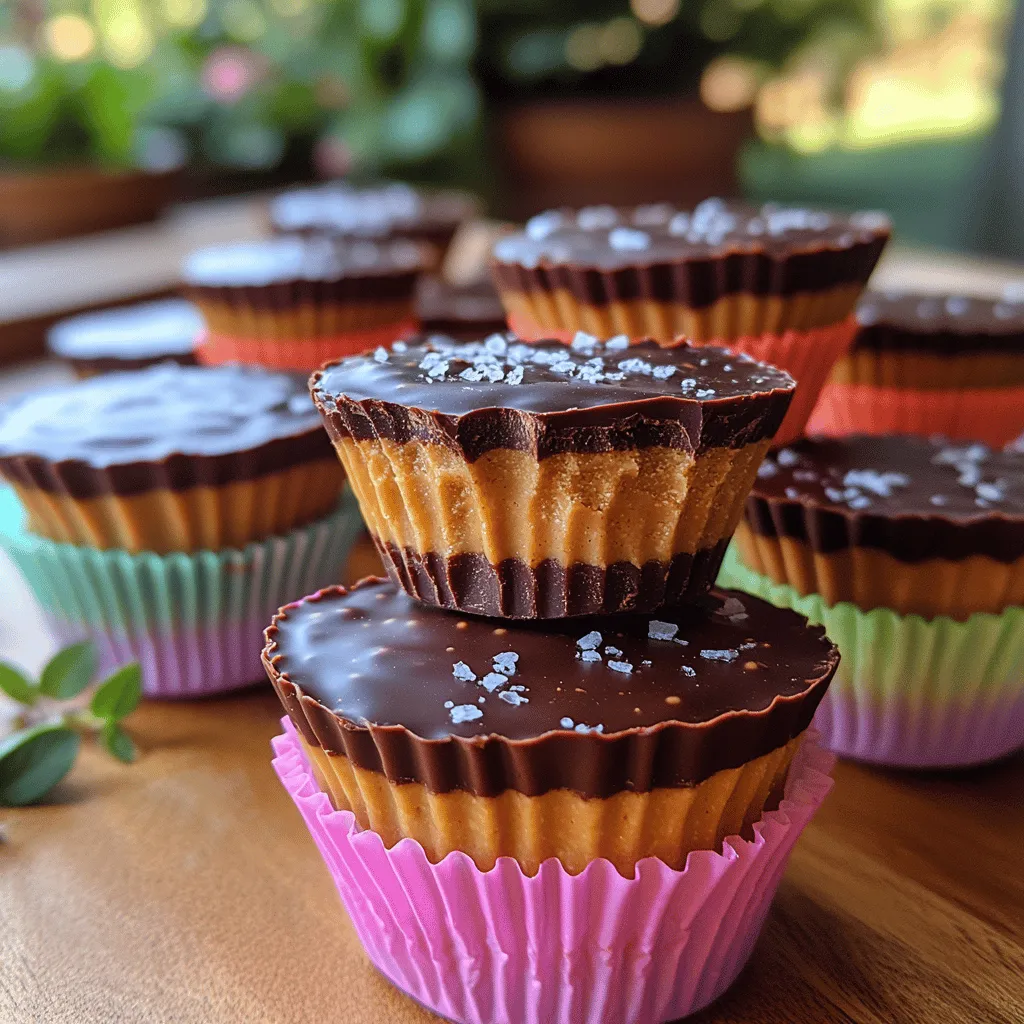
Sea Salt: A sprinkle of sea salt enhances the overall flavor profile of the peanut butter cups, creating a delightful contrast to the sweetness. Beyond taste, sea salt can also provide essential minerals, making it a wonderful addition to your guilt-free treats.
Preparation Steps Explained
Now that you’re familiar with the ingredients, let’s dive into the preparation process for your Guilt-Free Peanut Butter Cups.
Preparing the Cupcake Liners: The first step in making your peanut butter cups is to prepare the cupcake liners. Using silicone or paper liners is highly recommended, as they make it easy to remove the cups once they are set. If you don’t have liners on hand, you can also use a muffin tin lightly greased with coconut oil or simply pour the mixture into a small dish and cut it into squares once it has hardened.
Making the Peanut Butter Filling: The next step involves creating the luscious peanut butter filling. Start by combining your natural peanut butter with a natural sweetener of your choice, and mix until well combined. The amount of sweetener you add can be adjusted based on your taste preference, so feel free to taste and modify as you go. For added creaminess, you may consider mixing in a bit of coconut oil at this stage, which will also help the filling hold together once chilled.
With these initial steps outlined, you are well on your way to creating your Guilt-Free Peanut Butter Cups. As you continue through the recipe, you’ll see just how easy it is to indulge in a treat that satisfies both your cravings and your health goals. Stay tuned for the next part of the article, where we will delve deeper into the remaining preparation steps and tips for achieving the perfect peanut butter cups.
Combining Ingredients for Optimal Flavor and Texture
To create the perfect Guilt-Free Peanut Butter Cups, begin with your base ingredients: natural peanut butter, sweetener (like maple syrup or honey), and a pinch of salt. The quality of the peanut butter is crucial; choose a brand that contains only peanuts and salt for the best flavor. If you prefer a creamier texture, consider blending your peanut butter with a small amount of coconut oil. This not only enhances creaminess but also adds a subtle tropical flavor.
For those looking to amp up the nutritional profile, you can customize the filling by incorporating protein powder. A scoop of vanilla or chocolate protein powder not only adds a protein boost but also thickens the mixture, giving your filling a delightful texture. Alternatively, experiment with different nut butters such as almond or cashew butter for a unique twist on the classic peanut flavor. Just remember to adjust the sweetness accordingly, as different nut butters have varying levels of natural sweetness.
Melting the Chocolate
Methods of Melting Chocolate
The key to a smooth and silky chocolate coating lies in the melting process. You can choose between two popular methods: using the stovetop or the microwave.
Stovetop Method: Place a heat-proof bowl over a pot of simmering water, ensuring the bowl doesn’t touch the water (this is called a double boiler). Add your chopped chocolate to the bowl and stir frequently until melted. This gentle heat helps prevent burning and ensures even melting.
Microwave Method: If you’re short on time, the microwave is a quick and effective option. Place your chopped chocolate in a microwave-safe bowl and heat in 30-second intervals. Stir after each interval to promote even melting. Be cautious not to overheat, as chocolate can easily scorch in the microwave.
Tips for Achieving the Perfect Melt
To achieve the perfect melt, consider these tips:
– Use high-quality chocolate, as it melts better and provides a richer flavor.
– Chop chocolate into uniform pieces to ensure even melting.
– Add a small amount of coconut oil or vegetable oil to the chocolate before melting; this will help create a smoother texture and make it easier to coat the peanut butter cups.
– If you notice the chocolate is thickening too quickly, remove it from the heat or microwave and stir continuously until it smooths out.
Assembling the Cups
Step-by-Step Guidance
Now that your filling and chocolate are prepared, it’s time to assemble your Guilt-Free Peanut Butter Cups. Follow these steps for optimal results:
1. Prepare Your Molds: Line a muffin tin with paper or silicone cupcake liners. This makes it easy to remove the cups once they are set.
2. Layer the Chocolate: Pour a small amount of melted chocolate into the bottom of each liner, just enough to coat the base. Use the back of a spoon to spread it evenly. Place the molds in the refrigerator for about 10 minutes. This step helps create a solid base, preventing the filling from seeping through.
3. Add the Filling: Once the chocolate base is firm, take your peanut butter filling and scoop a generous tablespoon into each cup. Use the back of a spoon to flatten it, making sure it is evenly distributed.
4. Top with More Chocolate: Pour additional melted chocolate over the filling, covering it completely. Gently tap the muffin tin on the counter to remove any air bubbles and ensure an even layer on top.
5. Chill Again: Return the cups to the refrigerator for at least 30 minutes to allow the chocolate to set completely.
Creative Ideas for Variations
To add a personal touch to your Guilt-Free Peanut Butter Cups, consider these variations:
– Crushed Nuts: Before adding the final layer of chocolate, sprinkle some crushed almonds, walnuts, or hazelnuts on top of the filling for an extra crunch.
– Flavored Fillings: Mix in a teaspoon of vanilla extract or a pinch of cinnamon to your peanut butter filling for a flavor boost.
– Dark Chocolate Drizzle: After the cups are set, melt some dark chocolate and drizzle it over the tops for a decorative and delicious touch.
Chilling and Serving the Cups
Importance of Chilling Time
Allowing your Guilt-Free Peanut Butter Cups to chill is crucial for achieving the right consistency. The chocolate needs time to harden properly, ensuring a perfect bite. Ideally, let them sit in the refrigerator for at least one hour after assembling. If you’re in a hurry, you can place them in the freezer for about 15-20 minutes, but be careful not to freeze them completely.
Serving Suggestions
Presentation can elevate your homemade treats. Consider these serving ideas:
– Plated Presentation: Arrange the cups on a decorative plate, and dust with cocoa powder or shredded coconut for an elegant touch.
– Pairing Options: Guilt-Free Peanut Butter Cups pair beautifully with a cup of coffee or tea, enhancing the overall flavor experience. They also make a delightful dessert after a light meal.
Storage and Longevity
Best Practices for Storing
To keep your Guilt-Free Peanut Butter Cups fresh, store them in an airtight container. They can be kept in the refrigerator for up to two weeks. If you want to extend their shelf life, consider freezing them.
Freezing and Thawing
To freeze the cups, place them in a single layer in a freezer-safe container, separating layers with parchment paper to prevent sticking. They can last for up to three months in the freezer. When you’re ready to enjoy them, simply remove the desired number of cups and let them thaw in the refrigerator for about 30 minutes before serving.
Nutritional Information
For those mindful of their dietary intake, understanding the nutritional content of your Guilt-Free Peanut Butter Cups is essential. Here’s a breakdown per serving (assuming the recipe yields 12 cups):
– Calories: Approximately 120
– Fats: 8g (mostly healthy fats from nut butter)
– Carbohydrates: 10g
– Proteins: 3g
Compared to traditional peanut butter cups, which can contain upwards of 200 calories and a significant amount of added sugar, these guilt-free alternatives offer a healthier option without sacrificing flavor. The natural ingredients not only provide a more wholesome treat but also bring essential nutrients to your diet.
Conclusion
Making Guilt-Free Peanut Butter Cups at home is not just a fun kitchen project, but a rewarding way to indulge in a beloved treat without the guilt. The satisfaction of creating a healthier version of a classic dessert allows you to enjoy the balance of indulgence and wellness. Whether you’re treating yourself or sharing with friends and family, these homemade cups are bound to impress.
Explore more healthy dessert recipes and embrace the joy of cooking with wholesome ingredients. With just a few tweaks to traditional recipes, you can enjoy delicious flavors while staying true to your health goals. So roll up your sleeves, get creative in the kitchen, and savor the delightful experience of making Guilt-Free Peanut Butter Cups!
