Introduction
Fudge is a beloved dessert that has been enticing sweet tooths for generations. Its rich, decadent nature makes it a perfect treat for any occasion, whether you’re celebrating a birthday, hosting a holiday gathering, or simply indulging in a sweet reward for yourself. Among the myriad of fudge variations available, one stands out for its lusciousness and simplicity: Creamy Peanut Butter Dream Fudge. This delightful confection combines the irresistible flavors of creamy peanut butter and sweet vanilla, creating a texture so smooth that it melts in your mouth.
What makes this recipe particularly appealing is not only its rich flavors but also its accessibility. Whether you’re a novice baker or a seasoned kitchen pro, you’ll find that the process of making this fudge is incredibly straightforward. With just a handful of ingredients and minimal effort, you can whip up a batch of Creamy Peanut Butter Dream Fudge that will impress family and friends alike.
Understanding the Ingredients
To create the perfect Creamy Peanut Butter Dream Fudge, it’s essential to understand the role of each ingredient. This not only helps in mastering the recipe but also allows you to appreciate the intricacies of flavor and texture that each component brings.
Creamy Peanut Butter
At the heart of this fudge is creamy peanut butter, which is responsible for its signature flavor and texture. The richness of peanut butter provides a nutty sweetness that complements the overall dessert beautifully. When selecting peanut butter for this recipe, opt for a high-quality, creamy variety without added sugars or hydrogenated oils. This ensures you get an authentic peanut flavor that shines through. The smooth texture of creamy peanut butter is vital, as it contributes to the fudge’s velvety mouthfeel.
Unsalted Butter
Unsalted butter is another key ingredient that enhances the richness of the fudge. It plays an essential role in achieving a creamy consistency while providing a luxurious taste that balances the sweetness of the fudge. By using unsalted butter, you have better control over the salt levels in your dessert, allowing you to adjust for taste. It’s important to melt the butter gently to prevent it from burning; this can affect both the flavor and texture of your fudge.
Powdered Sugar
Powdered sugar is the primary sweetening agent in this recipe. Unlike granulated sugar, powdered sugar dissolves easily, resulting in a smooth and creamy fudge without any graininess. It also contributes to the fudge’s structure, helping it set properly while maintaining that luscious, melt-in-your-mouth texture. The sweetness of powdered sugar is perfect for balancing the earthy notes of the peanut butter, creating a harmonious flavor profile.
Vanilla Extract
Vanilla extract is a must-have ingredient that elevates the flavor of the fudge. Its subtle sweetness and warm aroma enhance the overall taste, rounding out the richness of the peanut butter and butter. When choosing vanilla extract, opt for pure vanilla rather than imitation for the best flavor. A splash of vanilla can transform simple recipes into something extraordinary, and this fudge is no exception.
Salt
Incorporating a pinch of salt is crucial in balancing the sweetness of the fudge and enhancing the flavors of the other ingredients. Salt acts as a flavor amplifier, making the peanut butter and vanilla notes pop while preventing the fudge from tasting overly sweet. It’s a small addition that makes a significant difference in the overall taste.
Optional Ingredients: Chocolate Chips and Chopped Peanuts
While the base recipe for Creamy Peanut Butter Dream Fudge is delightful on its own, you might want to consider adding optional ingredients to take it to the next level. Chocolate chips can be folded into the fudge mixture to create a deliciously contrasting flavor that pairs wonderfully with peanut butter. The richness of chocolate complements the nutty sweetness of peanut butter, creating a more complex dessert experience.
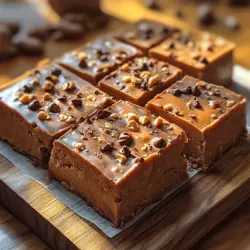
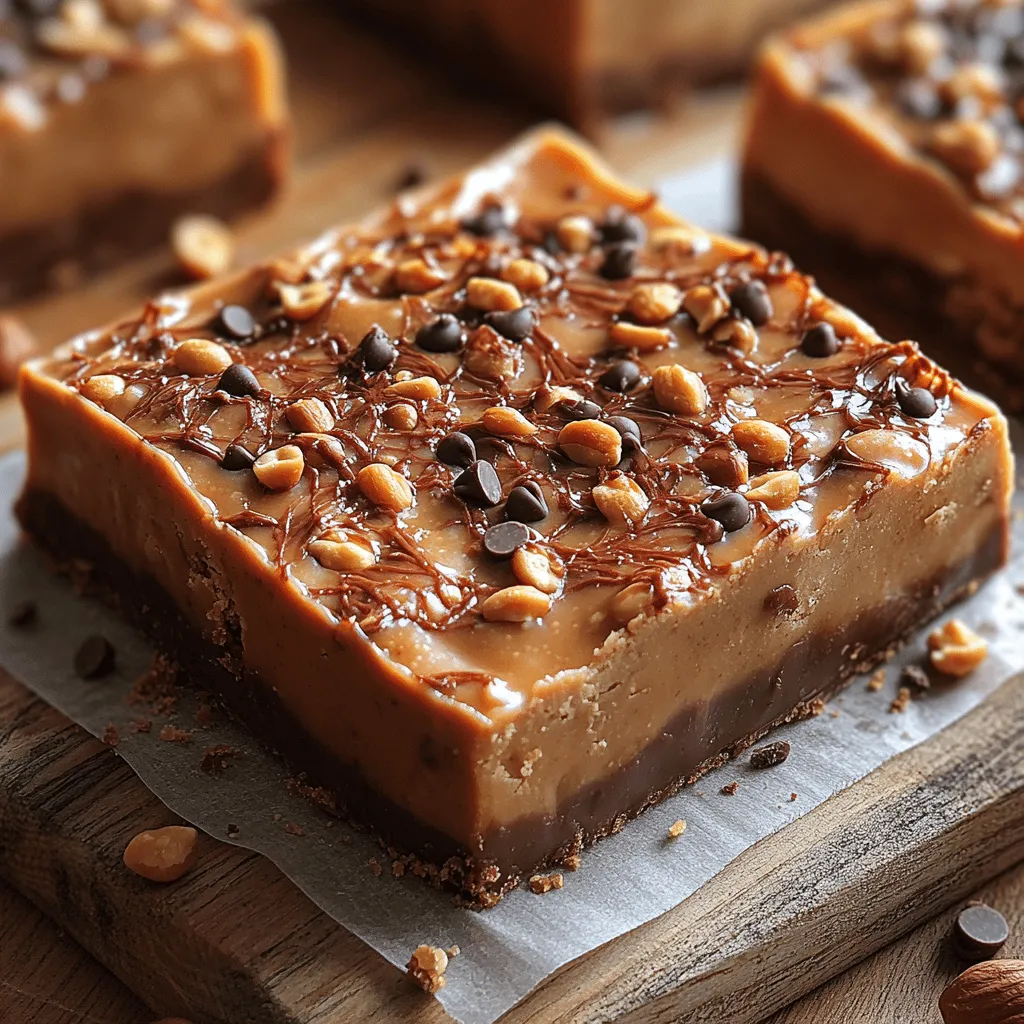
Chopped peanuts can also be sprinkled on top of the fudge before it sets. They add a delightful crunch and additional peanut flavor that elevates the overall texture and presentation. Including these optional ingredients not only enhances the taste but also creates visual appeal, making your fudge even more enticing.
Step-by-Step Instructions for Creamy Peanut Butter Dream Fudge
Now that you understand the ingredients and their roles, it’s time to dive into the step-by-step process of making Creamy Peanut Butter Dream Fudge. Follow these instructions carefully to ensure a perfect outcome.
Preparing the Pan
Before you start mixing the ingredients, it’s important to prepare your pan for the fudge. Line an 8-inch square baking dish with parchment paper, allowing some overhang on the sides. This will make it easy to lift the fudge out of the pan once it has set. Make sure to smooth out any wrinkles in the parchment to prevent them from transferring to the fudge. A well-prepared pan is essential for achieving clean cuts and a beautiful presentation.
Melting the Butter
Start by melting the unsalted butter in a medium saucepan over low heat. Stir the butter gently as it melts to ensure it doesn’t burn. If you’re using a microwave, place the butter in a microwave-safe bowl and heat it in short intervals of 15-30 seconds, stirring in between until fully melted. Be patient during this process; burning the butter can impart a bitter flavor to your fudge, so low heat is key.
Mixing the Peanut Butter
Once the butter is melted, remove the saucepan from the heat and add the creamy peanut butter. Stir the mixture until it becomes smooth and well combined. To achieve a lump-free consistency, it’s best to use a whisk or a spatula for this task. If your peanut butter is particularly thick, you can return the saucepan to very low heat for a moment to help loosen it up, but be careful not to overheat. Mixing the peanut butter thoroughly with the melted butter ensures an even distribution of flavors throughout the fudge.
As you combine these two key ingredients, take a moment to appreciate the enticing aroma that fills your kitchen. The nutty scent of peanut butter combined with the rich buttery notes creates an inviting atmosphere that will have everyone eagerly anticipating the finished product.
The Next Steps
After mixing the peanut butter and butter, you’ll be ready to incorporate the powdered sugar and other ingredients, creating the luscious fudge mixture that will soon be transformed into a sweet indulgence. Stay tuned for the next part of this article, where we will continue with the remaining steps to create the perfect Creamy Peanut Butter Dream Fudge, ensuring that every bite is a heavenly experience.
Incorporating Sugar and Flavor: Techniques for a Well-Mixed Fudge Base
To create the perfect Creamy Peanut Butter Dream Fudge, it’s essential to incorporate the sugar into your base effectively. Start by combining your granulated sugar, brown sugar, and butter in a large saucepan over medium heat. Stir the mixture continuously until the sugar dissolves completely, which usually takes about 5 minutes. This step is crucial because it ensures that the sugar crystals are fully integrated, resulting in a smooth and creamy texture once your fudge sets.
Next, once the sugar has dissolved, reduce the heat to low and add the creamy peanut butter and sweetened condensed milk. Stir vigorously until everything is well combined. The warm mixture should be glossy and thick, indicating that the sugars and fats are well emulsified. To boost the flavor profile, consider adding a pinch of salt, a teaspoon of pure vanilla extract, or even a sprinkle of cinnamon. Each of these elements can elevate your fudge from delightful to divine.
Pouring and Spreading: Tips for Achieving an Even Surface
Once your fudge base is perfectly mixed, it’s time to pour it into the prepared baking dish. Use a spatula to scrape the mixture from the saucepan, ensuring you leave nothing behind. When pouring, do so from one corner of the dish to allow the fudge to spread evenly without creating air pockets.
With the fudge in the dish, use the spatula to gently spread the mixture to the edges. It’s important to work quickly during this step, as the fudge will begin to set as it cools. For an even smoother surface, you can lightly tap the baking dish on the countertop, which will help eliminate any bubbles and encourage the fudge to settle uniformly.
Topping with Chocolate: Optional Step for an Enhanced Flavor Experience
While the Creamy Peanut Butter Dream Fudge is delicious on its own, you can elevate it further by adding a chocolate topping. To do this, melt semi-sweet or dark chocolate chips in a microwave-safe bowl in increments of 30 seconds, stirring in between until smooth. Be cautious not to overheat, as burnt chocolate can ruin the flavor and texture.
Once your chocolate is melted, pour it over the fudge base, using a spatula to spread it evenly across the top. This layer not only adds a decadent chocolate flavor but also provides a beautiful contrast against the creamy peanut butter base. For an added touch, consider sprinkling chopped nuts, sea salt, or mini chocolate chips over the top before the chocolate sets.
Chilling the Fudge: Importance of Refrigeration for Achieving the Right Firmness
Refrigeration is key to achieving the right texture for your fudge. Once you have poured and spread your fudge (with or without the chocolate topping), cover the dish with plastic wrap or aluminum foil and place it in the refrigerator. Allow it to chill for at least 2-4 hours, or until it has hardened completely.
The cooling process helps the fudge to firm up and develop its characteristic texture. It’s also worth noting that if you are in a hurry, you can speed up the process by placing the fudge in the freezer for about 30 minutes. However, be cautious not to leave it in too long, as this can result in a change in texture.
Slicing and Serving: Best Practices for Cutting and Serving the Fudge
Once your fudge has chilled to perfection, it’s time to slice and serve. The best way to cut fudge is to use a sharp, warm knife. To warm your knife, run it under hot water for a few seconds, then dry it before slicing. This technique helps to achieve clean cuts through the rich, dense fudge without dragging or tearing it.
Cut the fudge into small squares or rectangles, as a little goes a long way with this indulgent treat. Serve the fudge on a decorative platter or place individual pieces in cupcake liners for an appealing presentation. If you’re serving a crowd, consider pairing the fudge with a scoop of vanilla ice cream or drizzling it with caramel sauce for an extra treat.
The Joy of Making Fudge at Home
One of the greatest joys of making fudge at home is the ability to customize it to your liking. Unlike store-bought options, which can be overly sweet or lack texture, homemade fudge allows you to control the ingredients and adjust the flavor to suit your preferences.
You can explore various variations by adding different ingredients, such as chopped nuts for crunch, dried fruits for a chewy texture, or even different types of chocolate, such as white chocolate or milk chocolate. These variations can make your fudge uniquely yours, and experimenting with flavors can lead to delightful surprises.
Moreover, sharing homemade treats with family and friends brings a sense of joy and community. Whether it’s gifting a box of fudge for a birthday celebration or bringing a batch to a potluck, the effort put into making something from scratch is often appreciated far beyond the taste.
Storage and Shelf Life
To keep your Creamy Peanut Butter Dream Fudge fresh, proper storage is essential. Once fully set, store the fudge in an airtight container at room temperature for up to a week. If you live in a particularly warm climate, or if you want to extend its shelf life, you can refrigerate the fudge, where it can last for up to two weeks.
Avoid exposing the fudge to humidity, which can affect its texture and make it sticky. If you want to keep your fudge for a longer period, consider freezing it. Wrap individual pieces in wax paper and place them in an airtight container or freezer bag. When stored this way, the fudge can last for up to three months. To enjoy, simply thaw it in the refrigerator overnight before serving.
Nutritional Information
While indulging in homemade fudge, it’s important to be mindful of nutritional content. A typical serving of Creamy Peanut Butter Dream Fudge (approximately 1 inch square) contains about 120 calories, 8 grams of fat, 10 grams of carbohydrates, and 2 grams of protein. This treat is rich in flavor but should be enjoyed in moderation.
When consuming desserts like fudge, balance is key. Pairing your fudge with fresh fruit or nuts can enhance the overall nutritional profile of your snack. Additionally, being aware of portion sizes can help you savor the fudge without compromising your dietary goals.
Conclusion
The Creamy Peanut Butter Dream Fudge is not just a dessert; it’s an experience that brings joy and satisfaction to those who make and share it. With its rich flavor and creamy texture, this fudge recipe is easy to follow and allows for plenty of customization. Whether you’re indulging in a piece yourself or sharing it with loved ones, the satisfaction of creating a delicious homemade treat is unmatched.
So why not try your hand at making this delightful fudge? The process is straightforward, and the results are sure to impress. Gather your ingredients, embrace the joy of cooking, and enjoy the sweet rewards of your efforts!